Prepping the Laser Cutter:
1. The power switch is on the left panel toward the rear of the machine.
2. Turn on the compressed air line
To import a file from AutoDesk Inventor to Corel Draw:
1. Right-click on the face of the part you want to cut.
2. Select “Export Face As...”
3. Choose AutoCAD .dxf
4. In the options box, ensure that the output is year 2012 or earlier.
5. In Corel Draw X6 select File→Import and select your .dxf file.
6. Ensure that the Auto-Reduce Nodes box is unchecked.
Computer:
1. To log into the computer, see Prof. Spenko or the TA.
3. Set your page size to either 24”x18” or to the size of your material.
4. To make a vector cut, be sure that the line width is set to “hairline.”
5. Click Print. A warning dialog box might show up. Click OK or cancel.
6. Click Preferences.
7. Click Auto-focus only if needed. Otherwise it wastes valuable time.
8. Match the sheet size with your Corel Draw sheet size.
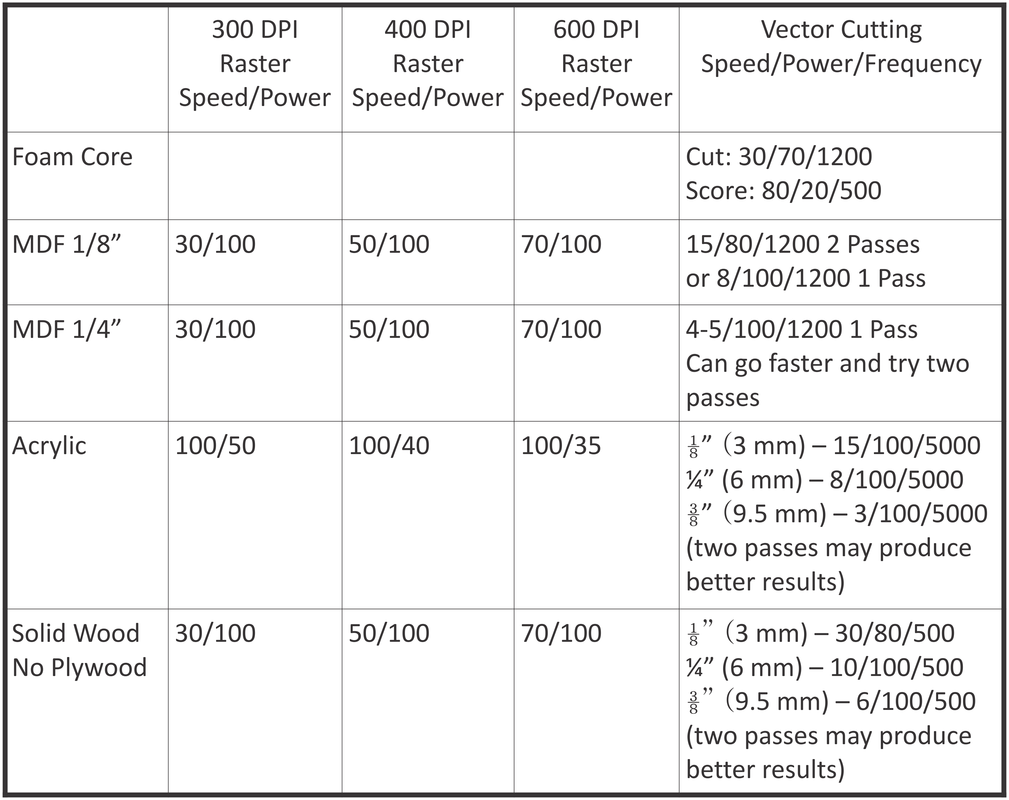
9. Adjust your Speed, Power, and Frequency settings as needed.
10. Click OK, Print.
Laser Cutter:
1. The file name should now be visible in the Laser Cutter display.
2. Click the green Go button and keep your finger over the red Stop button. Stand by the laser cutter while it is cutting. This is especially important if you are cutting foam core board or mdf.
3. Stand near the laser cutter. Don't be the person you starts the laser cutter on fire! Seriously, don’t be that person.
Troubleshooting:
1. Sometimes the job is not sent to the laser cutter. When this happens, turn the laser cutter off and then back on.
2. If you want to check the path of the cut without cutting anything, run the laser cutter with the glass panel open. and the red pointer on.
3. Never autofocus in an area that has already been cut. This will jam the laser cutter. If this happens, see Prof. Spenko or the TA.
4. If for any reason you do not understand anything about the laser cutter, ask the TA or Prof. Spenko. We cannot afford to have this machine break during the semester.
