|
Previous Assignment: Tehcnical Writing Assignment
|
Sustainable Chair Part 1
|
Next Assignment: Sustainable Chair Part 2
|

- Step 1: Functional Requirements. Design a chair that meets the following functional requirements:
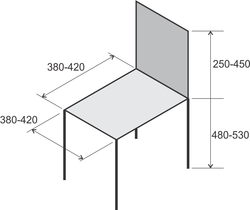
- Hold a 80kg man
- 480mm < Seat height < 530 mm
- 380 < seat depth < 420 mm
- 380 < seat width < 420 mm
- 250 < back height (from seat) > 450 mm (see photo below)
- made entirely of 18" x 24" x 3/16" (5mm) foam core board
- no fasteners, glue, tape, etc.
- mass < 500g (< 400g = bonus point)
- Step 2: Generate Solutions. Hand sketch at least 3 designs on isometric grid paper. Use at least one sheet of paper per design and fill the entire paper with your design. Note any important features.
- Step 3: Analysis. On separate sheets of paper, draw the lines of force for each design. You may want to draw isolate particular aspects of your design. For example, it would be useful to draw the lines of force for seat/back portion and separately draw lines of force for the legs. Please use the entire page for your drawings. It is very difficult for both you and the TAs to evaluate a design that is drawn too small.
- Step 3: Analysis. Identify potential stress concentrations. Get rid of them using fillets, chamfers, or reinforcements by redrawing the chair if necessary. No stress concentrations? Great. Turn it in as is.
- Take a picture of your concepts for the next assignment. You will not get the graded assignment 1 back in time.
Grading
4 points
- Hand Sketches
- Lines of Force
- Identification of Stress Concentrations
Educational Goals
- Become more proficient at hand sketching
- Be exposed to an open end design problem of which there are many "right" answers
- build an "sustainable" chair (no fasteners or glues. Yes, I do understand that foam core board is not the most sustainable material. We work within limitations).
- Understand the importance of removing unnecessary material: light-weighting
- Time management
Hints
- Keep it simple! Make the fewest amounts of cuts you can in the foam core
- Use truss structures, gussets, and fillets to keep the weight down and rigidity up.
- compression = bad; tension = good (generally)
- be aware of the size limitations of the foam core. Don't design anything that can't be "printed" on a sheet larger than 24" x 18".
- Keep all of this information. This is the 'analysis' portion of your assignment, and you will need to include it in a formal technical paper that you will write in a couple of weeks.
- Test your chair before you have me sit on it. It should be strong enough to withstand several cycles of sitting. The chair I made lasted about 10 sittings. Students have made chairs in the past that have lasted well into 30+ sittings.
- Start now. You will be surprised at how long manufacturing takes and how in-demand the laser cutter will be near the deadline. If your design works the first time, consider yourself lucky.